What is EMEET StreamCam One ?
As communication equipment develops, mobile live streaming has become an inevitable trend, but traditional live streaming equipment often has problems such as being too expensive, difficult to operate, and various data lines being tangled. EMEET StreamCam One, as a multi-position and wireless streaming camera, has made the complex and expensive live streaming equipment easy to use and reasonably priced, and its completely wireless live streaming form allows users no longer to be troubled by data lines. With the help of the EMEETSTREAM software on the mobile phone, users can add materials during live streaming and push live streaming to multiple platforms, so that users can share the wonderful moments of on-site activities comprehensively and simply. For users who are new to live streaming, EMEET StreamCam One can effectively provide them with professional and simple wireless multi-position live streaming solutions.


What scenarios can StreamCam One be utilized?
StreamCam One can meet your live streaming and recording needs for a variety of scenarios such as weddings, food tutorials, handicrafts, teaching, sports, and podcasts, so you can share your wonderful moments with online audiences and immerse yourself in the scene.
Weddings: Let friends from afar also share the joy and emotion of the moment.
Food Tutorials/Handicrafts: Every step of tutorial is full of details and clearly presented.

Sports: Combine distant and close-up, master the details of the actions (Indoor/Softball).

Podcasts: Clearer and brighter voices, better auditory experience.

What's in the box?
A single EMEET StreamCam One package includes the following items:
Overview


How to Install and Use StreamCam One
You can place it directly on a flat surface, such as a desktop, or use a standard 1/4" threaded tripod mount to install it at the bottom of the StreamCam One.


Note: StreamCam One supports inverting. After connecting the camera, you can select camera parameters in the app, enable autoflip, and invert according to the requirement.
How to start StreamCam One?
Please press and hold the power button on the back of the StreamCam One for 2 seconds until the back power indicator light turns white and the front status indicator light turns steady blue.
If the front status indicator light of the StreamCam One turns flashing green while the back power indicator light stays white, indicating the current power, then the StreamCam One has been fully powered on and you can proceed to the next step.

StreamCam One specifications
| System | Connection Mode | Answering a phone call while live streaming |
|---|---|---|
| VIDEO | Image Sensor: | Sony® 1080p sensor (IMX307) |
| Sensor resolution: | 2 million pixels | |
| Capture resolution: | 1080p - 1920x1080 | |
| Aspect ratio: | 16:9 | |
| Frame rate: | 30fps | |
| Video (MP4 recording only): | 1080p30 / 720p30 | |
| Video (streaming): | 1080p30fps / 720p30fps / 480p30fps / 360p30fps | |
| Video codec: | H.264 | |
| Electronic image stabilization: | None | |
| Vertical image flip: | Yes | |
| High dynamic range imaging: | Yes | |
| Metering mode: | Average, Center, Spot | |
| White balance: | Yes | |
| White balance presets: | Yes | |
| Exposure mode: | Yes | |
| Exposure compensation: | Yes | |
| Focus type: | Fixed | |
| Field of view: | 90 degrees (diagonal) | |
| Low light/night mode: | No | |
| AUDIO | Built-in audio: | 2 built-in microphones and 1 wireless lapel microphone |
| External microphone audio input: | Access external microphone via 3.5mm TRS interface | |
| Mixer: | Through EMEETSTREAM control external audio source selection and gain | |
| Speaker: | None | |
| Microphone Sample Rate: | 48kHz | |
| CONNECT | Audio codec: | PCM,AAC |
| Network support: | 2.4G/5G | |
| Ethernet: | Support Ethernet adapter connection. Also supports charging through PoE (Ethernet power supply) | |
| LTE: | None | |
| Streaming bandwidth requirements: | HD - up to 3.5 Mbps (recommended stable upload speed of at least 2 Mbps) SD - up to 1.5 Mbps (recommended stable upload speed of at least 800 kbps) |
|
| RTMP support: | Yes | |
| USAGE | Battery life: | 8 hours |
| Size: | 96mm*59mm*78mm | |
| Weight: | 265g | |
| Color: | Black | |
| Provided interfaces: | Micro SD slot | |
| Waterproof: | No | |
| Maximum supported storage card capacity: | 256G | |
| Includes memory: | No | |
| Buttons: | The camera has a button on the back that can power on/off, start/stop recording, and check WiFi signal (configurable according to user's preference). | |
| Operating temperature: | 0°C~35°C | |
| Remote power on/off: | Through USB-C charging cable | |
| Installation: | Supports 1/4" screw hole | |
| Supports NDI: | No | |
| APP Support: | EMEETSTREAM software has a Windows version for computers and iOS/Android versions for mobile phones. |
The camera's metering mode refers to a setting that is used to measure the intensity of light so that the camera can automatically adjust exposure and other parameters according to the strength of the light. Common metering modes include the following:
1. Average metering mode: The camera will measure the brightness of the entire picture area and determine the exposure parameters according to the average brightness of the picture, which is suitable for most cases.
2. Central-Weighted Metering Mode: The camera will only measure the brightness of the central area of the picture, which is suitable for scenarios that need to emphasize the main body.
3. Spot Metering Mode: The camera will only measure the brightness of the area where the focus is located, which is suitable for scenarios that require accurate measurement of a point.
4. Matrix Metering Mode: The camera will divide the entire picture area into several small areas, measure the brightness of each area separately, and consider the final exposure parameters comprehensively, which is suitable for shooting complex scenes.
Different metering modes are suitable for different shooting scenes and requirements. You can choose the most appropriate one according to the actual situation.
How to set up the camera position of StreamCam One?
In order to present a better live streaming effect, we suggest that you place the camera 70cm away from the subject to be filmed.
How to upgrade the firmware of StreamCam One?
If there is a new firmware version of StreamCam One, our EMEETSTREAM app will remind you. In order to better use StreamCam one, we suggest that you upgrade the firmware to the latest version.
Please follow the steps below to upgrade StreamCam One:
1. Before upgrading, please make sure that the StreamCam One has a battery level of more than 50%. If the battery level is insufficient, please charge the StreamCam One first.
2. Turn on the StreamCam One, connect it to your phone. Please refer to How many ways to add camera links does EMEETSTREAM offer? for the connection procedure.
3. After connecting successfully, enter the EMEETSTREAM software and click Camera Settings, then select Firmware Update
4. If you want to upgrade the wireless mic together, please make sure that the wireless mic is magnetically absorbed on the camera and follow the instructions of the app.
5. Make sure that your mobile phone and device are as close as possible during the upgrade process, and that the current network status is stable. In order to ensure the smooth progress of this upgrade operation, we strongly recommend that you do not perform any other operations and wait quietly for the device to upgrade. The entire upgrade process takes about 5 minutes;
6. After the upgrade is successful, StreamCam One will reboot automatically. Please wait quietly and the firmware information will be updated to the latest version after rebooting.
Note: StreamCam One currently only supports mobile phone EMEETSTREAM for firmware upgrades. The upgrade function of computer software EMEETSTREAM will be developed later.
How to turn on and off the wireless microphone?
If the wireless microphone is placed on the corresponding camera, then just press the camera power button, and the wireless microphone will turn on with the camera.

Press and hold the wireless microphone button for 2 seconds to turn the wireless microphone on /off.

If the wireless microphone is powered on without being connected to the camera, it will shut off after 5 minutes of inactivity.
How to pair the wireless microphone?
We have already paired the wireless microphone with the camera in advance, just turn on the mic and it's ready to use, no need to pair it again.
If you want to re-pair the camera with the wireless microphone, or need to pair a new wireless microphone with the camera, please do the following operation:
1. Connect the camera and mobile phone, please refer to xxxxx
2. Place the wireless microphone to be paired on the corresponding camera, and double-click the mute button of the wireless microphone
3. If the light of the wireless microphone changes from flashing blue to steady blue, the wireless microphone is successfully paired with the camera.
The wireless microphone battery
Battery capacity:160mAh
Battery life:9.5h
Charging time:1.5h
Use while charging:Yes
Charging Method: Place it on the magnetic suction point of the camera to charge.

Note:
1. As long as you place the wireless microphone on the camera's magnetic suction point, whether the camera is turned on or off, you can charge the wireless microphone. The power indicator light of the wireless microphone flashes in red when charging, and when the wireless microphone is fully charged, the power indicator light is extinguished.
2. The wireless microphone only supports this charging method.
How to upgrade the firmware of a wireless microphone?
Wireless microphones need to be magnetically adsorbed on the camera before they can be upgraded. They cannot be upgraded separately.
How many pickup modes are there for a wireless microphone?
Wireless microphones have two sets of pick-up gain, long-range pick-up gain and near-field pick-up gain are different, which can meet your needs for different scenarios.
If you attach the wireless microphone to the camera, the microphone can pick up audio within 1-3 meters, effectively achieving long-range pick-up; if you take off the wireless microphone and clip it on the collar, the microphone can pick up audio within half a meter, picking up only your voice, effectively isolating other voices in the venue.

How to switch the wireless microphone to the built-in microphone pickup?
If you turn on both the camera and the wireless microphone, the wireless microphone will automatically connect to the camera. At this time, the wireless microphone will be used as a pickup device.
If you want to pick up voice via the built-in microphones, we suggest that you turn off the wireless microphone. The sound source indicator on the front will change from blue to green (after you set the network for the camera and connect to the mobile phone wirelessly). At this time, it is the built-in microphones that pick up voice.

StreamCam One battery
Battery capacity:5200mAh
Battery life:8h
Charging time:4h
Use while charging:Yes
Charging Method: Charge by plugging in the accompanying type-c data line to the power adapter or computer.
Note: We recommend using a 5v⎓2a power adapter to charge your StreamCam One to reduce charging time.
How long can the StreamCam One be stored when it is turned off?
After the product is fully charged, it can be stored for 1.5 years in the off state.
Can StreamCam One be charged with other data cables?
Yes, Please use the type-c data cable to plug into the back interface of the StreamCam One to charge.
We recommend that you use the data cable we provide to get a better user experience when the data cable is not lost.

How to View the Current Wi-Fi Signal on a Camera?
Refer to How many ways to add camera links does EMEETSTREAM offer? to connect the camera and the phone, enter the EMEETSTREAM app, click Camera Settings, and select the button function to be: Wifi signal display. At this time, press the camera power button briefly, the back power indicator light will be lit green to display the current wifi signal strength, the stronger the wifi signal, the more lights will be lit.
How to connect the camera to the wired network?
The camera has a built-in WiFi module, you can use our EMEETSTREAM software to wirelessly connect your mobile/computer to the camera. If you want a more stable network, you can use a wired network to access the camera.
Please connect the Ethernet interface to the USB-C to Ethernet adapter (which needs to be purchased separately) on the Ethernet port, and connect the USB-C interface to the C port on the back of the camera to connect the camera to the wired network.
If you want to connect your phone to the camera now, please connect your phone to the same network as the camera. At this time, the phone can wirelessly connect with the camera.

Note: If the status indicator light is red or green and always lit, your camera cannot be connected to the Ethernet. Please reset the camera until the status indicator light on the front turns green and starts flashing.


Networks supported by the camera
The camera supports using the following network connections:
-2.4G/5G WiFi
-Wired internet
-Mobile network
What is the maximum distance between streamcam one and a router?
The maximum distance between the device and the router is related to the performance of the WiFi router. In an unobstructed and interference-free environment, the distance can reach up to 50m.
To maintain a good network connection, it is recommended to shorten the distance between the device and the router.
Choosing a 5G router or decreasing the video resolution can help ensure the stability of the live streaming to some extent.
What are the recommended performance parameters for mobile and computer devices?
iOS: CPU model A14 or higher
-Android: CPU model Snapdragon 8Gen1 or higher
Computer: CPU not lower than Intel(R)Core(TM)i5-6200UCPU @ 2.30GHz 2.40GHZ, memory not less than 8GB
Why is it not recommended to use an open WiFi connection?
In large public places such as companies, hotels, and malls, open WiFi networks are formed by multiple routers connected through wired or wireless methods to provide a wide coverage of WiFi.
There may be differences in connection aspects between these routers, such as signal strength, which can affect the availability and continuity of RTMP connections.
Therefore, it is recommended that users do not use open WiFi in such scenarios.
Why can't the device connect to the network or connect unsuccessfully?
1. Check whether the camera device is connected to the same Wi-Fi network as the mobile or computer. If not, they cannot be connected.
2. Check whether there are too many devices connected to the Wi-Fi router.
When there are too many devices connected to a Wi-Fi router, there may be problems such as bandwidth limitation and network congestion, which can affect device network connections.
It is recommended to reduce the number of devices connected to the Wi-Fi router.
2.1. Bandwidth limitation: The speed of a Wi-Fi connection is limited, and as the number of connected devices increases, the available bandwidth for each device will decrease. This will cause the network speed to slow down, affecting the normal use experience of the device.
2.2. Network congestion: When too many devices are connected to the same Wi-Fi network, network congestion may occur. When devices compete for network resources and bandwidth, it may cause problems such as data transmission delay and packet loss.
How to turn on live streaming with the camera?
The camera needs to be used with our EMEETSTREAM software for live streaming.
if you connect the camera to the computer via a USB cable, you can also live stream through third-party streaming software.
Can live streaming, recording, and USB camera mode be enabled simultaneously?
No. Our camera does not support wired connection to the computer while recording to the sd card. If you plug in the computer while recording to the SD card and open the system camera, the computer will display a black screen; if you plug in the computer and open the system camera, select recording to the SD card, it will be displayed that the camera is occupied, the status indicator light on the front of the camera will flash yellow. Of course, we support you to live broadcast and record to the SD card at the same time, or live broadcast and connect to the computer at the same time.
Note: If you want to enable all three at the same time, please select to record video to the mobile/computer.
How to use the camera as a USB camera?
StreamCam one can be used as a USB camera. With StreamCam One turned on, please use the data cable with the Type-C interface to connect to the back interface. Connect the other end of the data cable to the computer, open the computer system camera to select StreamCam One, and the picture can be displayed.
How to save video to SD card?
Before recording to the SD card, you need to insert the SD card into your camera.
1. Turn on the camera and press the power button on the back of the camera (please make sure that the camera button function is set to record to the storage card, otherwise the camera will display a recording error, and the front status indicator of the camera will flash yellow). If the front status indicator of the camera turns red, the camera has enabled recording.
2. Please connect the camera to the mobile phone, enter the EMEETSTREAM app, click record, select record to the storage card, you can also select the desired resolution, click start recording to record it to the SD card, at this time the front status indicator of the camera turns red.
How to view and download SD card recordings?
Please connect the camera to your mobile phone, enter the EMEETSTREAM app, select settings, click on the storage card, you can view your recording, click on the icon at the bottom right to download or delete the video.
Of course, you can also take out the storage card, insert the storage card into the card reader to connect to the computer, you can view your recording on the computer and select to download.
How to check the remaining recording time of an SD card?
Please connect the camera and the mobile phone, enter the EMEETSTREAM app, click record, select record to the storage card. When you select the resolution you want, the app will show you the recording time at the current resolution.
How to save video to phone/computer?
If you want to save the recording to your phone/computer, please connect the camera to your phone first.
Enter the EMEETSTREAM APP, click Record, and select Record to Phone. You can also select the resolution you want.
Note: When selecting to record to the phone or computer, the color of the status indicator light on the front of the camera will not turn red to indicate that you are recording.
What is the difference between recording in computer/mobile phone and recording in SD card?
Recording in SD card: Record the picture presented by the camera connected to the SD card;
Recording in computer/mobile phone: Record the picture displayed in the mobile phone/computer (which may include the picture of three devices, depending on the preview picture displayed in the mobile phone/computer software when you switch the device).
How does the camera record while live streaming?
Please connect the camera and the phone, then enter the EMEETSTREAM app.
Click on live broadcast, select the platform you want to live broadcast on, and then click on record. You can synchronize the live broadcast picture.
If you want to record during the live broadcast, you can set the key function to record to the SD card. Please refer to how to save the video to the SD card, and press the power button briefly to record the camera image.
Note: The image of the SD card recorded by enabling the key recording is only the image taken by this camera.

Compatibility with SD cards
| Brand | Storage Capacity |
|---|---|
| SanDisk | 32G,256G |
| Transcend | 32G,64G |
| TEAMGTOUP | 32G,64G |
| BUFFALO | 32G,64G |
| Gigastone | 32G,64G |
| Kingdton | 64G |
| toshiba | 32G |
| Samsung | 128G |
How to format an SD card?
Please refer to xxxxx to connect the camera and the phone, enter the EMEETSTREAM app, click camera settings, and select format storage card.
How to insert/remove an SD card?
Insert the micro SD card with the side with contacts facing down into the card slot. To remove, press the installed micro SD card inward and it will pop out. Remove it from there.
Can the camera be connected to an external microphone for use?
Yes.We support 3.5mm TRS audio input. You can connect the 3.5mm TRS microphone interface to the microphone interface on the back of the camera. If the audio indicator light on the front of the camera is always on, it indicates that the microphone is connected.
Can the camera be connected to a USB microphone for use?
No. But we support your microphone connected to the 3.5mm TRS port.
Can the microphone be freely selected?
1. The camera can use a microphone through three connection methods, with the first priority being an external wired mic, followed by a built-in wireless magnetic mic, and finally the MC2's body mic.
Its priority is: 3.5mm external microphone > wireless microphone > built-in microphone.
2. The device can only use one of the connection methods to use the mic at a time and does not support selecting multiple connection methods for the mic simultaneously.
3. If users use three devices together, each device can use a different connection method microphone for sound pickup, and the mixing function can be enabled on EMEETSTREAM.
4. The function of selectively using the microphone of three connection methods is currently under development and will be pushed through software upgrades in the future.
What function does the Type-C port have?
-Charge
-Powering external devices
-Access to wired network (POE)
-Connect to the computer to realize the USB camera function
Indicator light


Key Function
Press and hold for 2s: Power On/Off.
Press and hold for 10s: Force Shut down.
Short press:
-No effect
-Record to micro SD card
-Display WIFI signal.
You can modify the key function through the EMEETSTREAM app. Please refer to the xxxx to connect the camera to the phone, enter the EMEETSTREAM app, click the camera settings, and select the function you want.
How to supply power to the camera through the USB-C port?
Refer to xxxxx to connect the camera to the phone, enter the EMEETSTREAM app, select the camera settings, and enable the power supply function for external USB devices.
How to supply power to the camera through the USB-C port?
Refer to xxxxx to connect the camera to the phone, enter the EMEETSTREAM app, select the camera settings, and enable the power supply function for external USB devices.
Camera auto shut-off
When your camera is turned on, the camera will automatically shut down to save power if the camera is idle for 15min.
If your camera is in the following state, it means that your camera is in idle state:
-Not connected to mobile phone/computer (wireless)
-Camera not opened when connected to computer via USB
-No button operation
-Supply power to external device without connection and button operation
Note: If you want to change the automatic shutdown time of the camera, please connect the camera to the mobile phone, enter the image settings in the EMEETSTREAM app, click automatic shutdown, and select the automatic shutdown time you want.
Can I use it without connecting to EMEETSTREAM?
Yes, you can connect the camera to the computer with a data cable, and the camera can be used as a USB webcam.
Does the camera have anti-shake function?
No, this camera does not support anti-shake. We suggest you use a tripod in a fixed position or a gimbal with anti-shake for use in a mobile state.
Does the camera support autofocus?
No , StreamCam One is a fixed focus camera that captures a clear image within 70 cm.
Camera System Compatibility
Win7, Win8, Win10, Win11
Note: The above only represents the system version supported by the camera. To know the version supported by the EMEETSTREAM software, please refer to xxxxx.
What is the purpose of the seat stickers inside the package?
If you have purchased two or more StreamCam One, you can attach the same serial number stickers to the paired camera and wireless microphone, making it easier for you to quickly distinguish each pair of devices.
USB-C to Ethernet Adapter Compatibility
Camera Connection Tutorial
When you open the EMEETSTREAM application for the first time, you need to enable both wifi and Bluetooth on your device to access the location, and it will search for nearby cameras.
To configure the camera's connection to the network, select the EMEET Camera (multiple selections are possible), and you will see a network configuration button lit up.
Then you can choose the connection method you want to use, you can select the connection type you want to use.
Using Wi-Fi Wireless Network
You will see a list of available wifi networks from the EMEET camera. Select the network and enter password.
Finally, you need to confirm whether the EMEETSTREAM application mobile device has also joined the same network (if it's already the same then no need to confirm again);
Return to home page and you have completed the adding process.
Using the hotspot feature of EMEET Camera
Use the hotspot feature of EMEET Camera.
Select one of you EMEET Camera as a router (In order for other EMEET cameras and your mobile device can access this camera's hotspot)
You'll need to set a hotspot password for the EMEET Camera
Connect the camera to the computer using a wired connection
If you have converted the EMEET camera into a wired webcam device for use, please connect the EMEET camera to the PC with a wired USB cable.
EMEETSTREAM application provides a PC program which supports wired connection for adding Emeet cameras.
Why does the eMeet camera connection require permission to request an address, and is it secure?
When using the EMEETSTREAM application, you will receive two permission request. Location permission and Bluetooth permission request; enabled to ensure that the program can scan and connect your EMEET camera smoothly.
Which mobile devices is the EMEETSTREAM app compatible with?
Applicable to all mobile devices running iOS 11 or above, or Android 8 or above.
Note: If you want to connect three StreamCam Ones, we recommend that you follow the configuration below:
| Processor | Mobile Models |
|---|---|
| Apple A13 and above | iPhone 14 series, iPhone SE(2022), iPhone 13 series, iPhone series, iPhone SE(2020), iPhone 11 series, iPad 9th generation, iPad Pro 12.9-inch 3rd generation, iPad Pro 11-inch |
| Samsung Exynos 1080 and abovee | Samsung:Galaxy S22 Ultra、Galaxy S22+、Galaxy S22、Galaxy S21 Ultra、Galaxy S21 |
| Vivo:vivo S16e、vivo S15e、vivo X70 Pro、vivo X60/vivo X60 Pro | |
| Qualcomm Snapdragon 865+ and above | Samsung:Galaxy S23、Galaxy S23+、Galaxy S23 Ultra、Galaxy Z Fold4、Galaxy Z Flip4、Galaxy S22、Galaxy S22+、Galaxy S22 Ultra、Galaxy S21、Galaxy S21+、Galaxy S21 Ultra、Galaxy Z Fold 3、Galaxy Z Flip 3、Samsung W22、Galaxy S21 FE、Samsung W21、Galaxy Note 20、Galaxy Note 20 Ultra、Galaxy Z Fold 2、Galaxy Z Flip 5G |
| Lenovo:moto X40, moto razr 2022, moto X30 Pro, Lenovo Legion Y70, Lenovo Legion Y90, Motorola edge X30, Motorola X30 Pro, Motorola X30 Champion Edition, moto S30 Pro, Motorola edge s, Motorola edge s pro, Motorola edge s30, Lenovo Legion Pro | |
| OPPO:OPPO Find X6 Pro, OPPO Find N2, OPPO Find X5 Pro Snapdragon Edition, OPPO Reno9 Pro+, OPPO Find X5, OPPO Find X3 Pro, OPPO Find N, OPPO K0 Pro, OPPO Find X3, OPPO Reno 6 Pro+ | |
| One Plus:OnePlus 11、OnePlus Ace Pro、OnePlus 10T、OnePlus Ace 2、OnePlus 10 Pro、OnePlus 9 Pro、OnePlus 9、OnePlus 9RT、OnePlus 9R、OnePlus 8T、 | |
| Realme:realme GT2 Master Exploration Edition, realme GT Neo5, realme GT2 Pro, realme GT, realme GT2, realme GT Master Exploration Edition, realme GT Neo2, realme Q5 Pro | |
| Xiaomi:XiaoMi 13、XiaoMi 13 Pro、XiaoMi 13 Ultra、XiaoMi 12S、XiaoMi 12S Pro、XiaoMi 12S Ultra、XiaoMi 12T Pro、XiaoMi MIX 2 Fold、XiaoMi 12、XiaoMi 12 Pro、XiaoMi POCO F4 GT、XiaoMI MIX 4、XiaoMi 11、XiaoMi 11 Ultra、XiaoMi 11 Pro、XiaoMi MIX FOLD、XiaoMi 10S、XiaoMi POCO F3、XiaoMi 12X | |
| Redmi :Redmi K60 Pro, Redmi K60 Champion Edition, Redmi K50 Ultimate Edition, Redmi K60, Redmi K50/Champion Edition, Redmi K50 e-Sports Edition, Redmi K40 Pro, Redmi K40 Pro+, Redmi K40, Redmi K40s | |
| Vivo:vivo X90 Pro+, vivo X2 Fold, vivo X Flip, vivo X Fold+, vivo X80 Pro Snapdragon Edition, vivo X Fold, vivo X Note, vivo X70 Pro+, vivo X60 Pro+, vivo S15, vivo S16 | |
| HUAWEI:Huawei Mate 50, Huawei Mate 50 Pro, Huawei Mate 50 RS Porsche Design, Huawei P60, Huawei P60 Pro, Huawei P60 Art, Huawei Mate X3, Huawei P50, Huawei P50 Pro, Huawei P50 Pocket overseas version, Huawei Mate Xs 2 | |
| Sharp:Sharp AQUOS R7 | |
| Sony:Sony Xperia 1 IV、Sony Xperia 1 IV Gaming Edition、Sony Xperia 5 IV、Sony Xperia 1 III、Sony Xperia 5 III | |
| HONOR:Honor Magic5, Honor 5 Pro, Honor 5 Ultimate Edition, Honor Magic Vs, Honor 80 Pro, Honor 80 GT, Honor Magic V, Honor Magic4, Honor Magic4 Pro, Honor Magic4 Ultimate Edition, Honor Magic 3 Pro, Honor Ultimate Edition, Honor Magic 3, Honor X40 GT | |
| ZTE:nubia Z50, nubia Z50 Ultra, nubia Z40S Pro, nubia Z40 Pro, ZTE Axon 40 Ultra, ZTE Tianji A41 Ultra, nubia Z30 Pro, ZTE Axon 30 Pro, ZTE Axon 30 Ultra, ZTE Axon 30, ZTE Axon 40 Pro | |
| Others:Meizu 20, Meizu 20 Pro, Meizu 20 INFINITY, iQOO 11, iQOO 11 Pro | |
| Kirin 9000E and above | Huawei:Mate 40 Pro, Mate 40 Pro+, Mate 40 RS Porsche Design, Mate X2, Huawei P50 Pro, Mate 40 |
| Dimensity 1100 and above | Xiaomi:XiaoMi 12 Pro、XiaoMi Poco X4 GT、XiaoMi POCO F3 GT、XiaoMi 11T |
| Redmi:edmi K50 Pro, Redmi K60E, Redmi K50, Redmi Note 11T Pro, Redmi Note 11T Pro+, Redmi K50i, Redmi Note 11T, Redmi K40 Game Enhanced Edition, Redmi Note 10 Pro | |
| Oppo:OPPO Find X6, OPPO Find N2 Flip, OPPO Find X5 Pro Dimensity Edition, OPPO Reno8 Pro+, OPPO Reno9 Pro, OPPO K10, OPPO Reno8, OPPO Reno 6 Pro, OPPO K9 Pro, | |
| OnePlus: OnePlus 10, OnePlus Ace 2V, OnePlus Ace, OnePlus Ace Racing Edition, OnePlus Nord 2T, OnePlus Nord 2 | |
| Realme: realme GT Neo3, realme GT neo, realme GT neo Flash Edition, realme Q3 Pro | |
| Vivo: vivo X90, vivo X90 Pro, vivo X80, vivo X80 Pro Dimensity Edition, vivo S16 Pro, vivo V27 Pro, vivo S15 Pro, vivo X70, vivo S12 Pro, vivo S10, vivo S10 Pro/S12, vivo S9 | |
| Honor: Honor 70 Pro+, Honor 70 Pro, | |
| Others: iQOO Neo 7, Transsion Tecno Phantom X2, Transsion Tecno PhantomX2 Pro, iQOO Neo7 SE |
When I receive a call while using EMEETSTREAM, will the camera be affected during the call?
| System | Connection Mode | Answering a phone call while live streaming |
|---|---|---|
| ios | WiFi Connection | Does not affect live streaming |
| Device Hotspot Connection | Does not affect live streaming | |
| Device wired network | Does not affect live streaming | |
| Mobile hotspot connection | Does not affect live streaming | |
| Android | WiFi Connection | Does not affect live streaming |
| Device Hotspot Connection | Live streaming paused, resumes after hanging up the phone call. | |
| Device wired network | Does not affect live streaming | |
| Mobile hotspot connection | Cannot live stream due to no network connection available. |
Can the APP be switched to run in the background during live streaming?
If you are streaming and want to switch the EMEETSTREAM app to the background
For iOS devices, the broadcasting connection can only be maintained if it is done through a WiFi router or wired Ethernet.
If your iOS device is using EMEET Camera Hotspot mode, it will cause the broadcasting to disconnect.
However, for Android devices, the broadcasting will continue.
Does the EMEET camera support other live streaming applications to get audio and video streams?
The EMEET camera provides a RIST protocol push streaming media. You can fill in the selected address, and the video stream of the EMEET camera will actively push the stream to the address.
In the camera settings, you can find the RIST option, enabling the feature will support you to get the streaming video of the camera directly with any application that supports this protocol.

Can EMEET StreamCam One be used as a virtual camera?
Only the EMEETSTREAM PC application supports this feature and it is enabled by default.
After launching the EMEETSTREAM PC application, select the EMEET Virtual Camera in the application you wish to use in.
Note: Only the virtual camera can be used, virtual audio is not available.
How to Use EMEET STREAMCAM ONE as a virtual camera in OBS STUDIO?
How to Use EMEET STREAMCAM ONE as a virtual camera in Zoom?
Can I stream using device hotspot connection?
Yes, you can. You can use the phone hotspot as a network environment for streaming. However, please note that using a hotspot for streaming may affect the video quality and stability, and the following issues may occur:
1. Due to the limitations of your phone itself, you may not be able to access the internet, which may cause difficulties in live streaming.
2. If you switch apps or place them in the background, you may lose connection with the camera. Since there is no internet, your phone will try to automatically switch to other WiFi connections.
3. Using a phone hotspot connection is more suitable for recording live streams. If you want to get better streaming effects and performance, it is recommended that you use a more stable WiFi connection.
How many ways to add camera links does EMEETSTREAM offer?
There are four forms as follows:
1. Add Wi-Fi wireless networks using a router;

2. Set EMEET Camera device hotspot connection add.

3. The mobile device first sets the hotspot signal, and then adds it through the Wi-Fi wireless network to join the network;


4. EMEET Camera equipment directly uses wired network cable;
Note: The software can recognize the EMEET camera as long as it is on the same network.
It is recommended that you use the first form of addition: Wi-Fi wireless network addition using the router
What happens if EMEETSTREAM is disconnected from the camera?
If there is a communication interruption between the EMEETSTREAM APP and the EMEET camera, the recording of the EMEET camera will continue, but the image will be lost until you reconnect the EMEETSTREAM to the camera.
The EMEETSTREAM APP will automatically reconnect to the camera, and if it fails to reconnect within 15 minutes, it will display that the camera is offline.
Why does the camera image change by itself?
If you find that the camera lens screen switches automatically, it may be the automatic position switching function has been switched on.
When multiple machines are connected, the EMEETSTREAM application can automatically conduct the screen switching. Click the icon under the video window to turn it on.

Why is the wireless microphone malfunctioning or devoid of an indication light?
Kindly ensure the wireless microphone is magnetically conjoined with the camera through the contact points and retained for a duration of two minutes.
Observe if a red indicator light flickers on the wireless microphone.
If present, it signifies the device is undergoing recharging. Once the charging process is accomplished, the device may be utilized normally.
What could be the reasons for a software's inability to install post-download?
The potential cause may be irregular recognition by certain antivirus software, hindering the installation of the software:
1. Prior to the installation of the software, it's advisable to momentarily disable your antivirus application, ensuring the software's successful installation.
2. Following the installation process, please add the software to your antivirus program's whitelist. This will avoid disruptions caused by the antivirus during the software's operation, thereby guaranteeing smooth functionality.
Set a password to access your EMEET camera
If you want to prevent others from connecting to your camera, you can set an access password for the camera from the Camera Settings in the EMEETSTREAM application.
When the set up is completed, other mobile devices need to enter the corresponding access password for the first time, in order to access the camera. As long as it is in the connection state, you can turn off the access restriction function at any time.
What if I forgot my camera access password?
If you don't remember the password, you can use a sharp object (such as a toothpick or needle) to lightly press the reset hole on the bottom of the camera for 2 seconds, which will restore the camera to its factory settings.
Please note that this will wipe out all the camera settings and recorded wifi info.
After restoration completed, you can connect to your camera without a password.

Change camera LED light display parameters?
You can adjust the brightness of the indicator light through the EMEETSTREAM app. As if you are live streaming in different lighting environments and having issues seeing the indicator light due to visual interference.

On - Turn on the indicator light; this is the default setting
Off - No indicator lights will be on when it is turned off
Brightness, you can use the slider to adjust the brightness of the lights around the ring.
Once you have closed the setting menu, all changes will effect immediately.
How to upgrade your EMEET camera firmware version?
Updating the camera firmware requires the camera to remain connected to the EMEETSTREAM app and the camera must be idle (not recording or streaming) in order to update the camera.
When there is a new version notification, you will see an update notification dot, indicating there is an update available.
Click on Update Now to update the latest firmware to your camera.
Note:
The camera battery level need to be above 50%;
The download speed and duration may vary according to the you network;
Keep the camera and EMEETSTREAM application connected during the update;
When the update has completed, the camera will automatically restart and the application will return to the home page. Wait for the camera to complete the self-check and boot up, then it will automatically reconnect.
How to turn on the RIST feature?
In the camera settings, you can find the RIST option, enabling the feature will support you to get the streaming video of the camera directly with any application that supports this protocol.
How to cancel the EMEET camera power auto shut down?
With no connection, no recording or streaming, the camera defaults to shut down automatically after 15 minutes of idle to save battery power. You can change this automatic shutdown time in the camera settings; the options are: 15min, 30min, 1h, 2h, never shut down.
How to control audio?
The app can control the audio source of each EMEET camera.
Streaming audio switch- you can switch the speaker icon under the video window to turn on and off the streaming audio sound.
Note: when increasing the local volume of the mobile device, it is recommended to use headphones to avoid echo feedback caused by the sound of the mobile device and the microphone of the camera.
Function and Meaning Explanation:
1. Volume visualization bar, which can tell the current audio volume size and active status;
2. Volume adjustment slider, which can increase the output of camera audio volume;
3. Mute button - when disabled, the EMEET camera will not record any sound.

How to adjust the image effect of EMEET camera?
You can access the image adjustment content by clicking on the first icon through the camera module cards listed below;
This page allows you to view the changes made in real time, taking effect immediately.
Function and Meaning Explanation:
1. HDR: stands for High Dynamic Range, which can display a larger range of brightness (dynamic range), and turning it on will give you a clearer imaging effect.
2. Anti flicker: Please select 60hz or 50hz depending on your local frequency.
3. Auto flip: This setting allows you to rotate the video vertically 180°:
Off (no rotation): If you invert the camera, the image will not flip.
On (rotate): The application will detect if the camera is facing up or inverted and adjust accordingly.
4. Exposure metering: Metering adjusts the exposure within the selected frame of the image, available options: Spot, Center, Average.
5. Mirroring: You can adjust the left and right and up and down direction of the image mirror flip.
How to enable Intelligent Camera Position and Switcher?
When multiple machines are connected, the EMEETSTREAM application can automatically conduct the screen switching.
Click the icon under the video window to turn it on;
The function will not be available if only one EMEET Camera is connected.
How to set time parameters for machine seat broadcast switching?
You can change your favorite director switch mode in the global settings;
Unified settings: cameras added by default program will participate in the rotation; You can light up the frame of the tab to select;
Individual settings: You can also set the duration of the playback for each position independently.
What is intelligent tracking?
This function allows the camera to conduct face tracking like an independent cameraman, which helps you to complete your shooting like in a professional broadcast studio.
Steps: Click the AI director assistant icon on the camera tab to enter the director window; Turn on the intelligent tracking to activate this function.
How to enable picture scaling?
After entering the director's window, you can freely drag and select the area of the picture you want to display;
Steps:
You can move the display picture by dragging with your fingers under the director's window;
Stretch the zoom range multiple times with two fingers; Release to take effect
Drag the display area with one finger; Release to take effect
Adjust the default zoom size parameters
The default zoom size clicked can be adjusted in settings, with a convenient zoom window and a quick switch between full screen display from 1.0x-3.0x.
There is a convenient scaling window and a fast switch between full-screen display.
How to set the speed of the default pan/zoom transition?
In the director window, the zoom display window can be freely changed in size and position; During this process, there will be a transition duration time. You can set the duration of the selected effect, which applies to all positions and cameras.
怎么开始直播?
Simultaneously live stream to multiple platforms
Add your live platform, then you can select multiple target platforms.
Please note that the stability of multi-platform live streaming largely depends on the performance of your mobile phone/computer and the bandwidth of the current network.

After I have completed the push stream, can I turn off my mobile device?
Yes, once you have completed the push stream to your target platform, you can continue to stream even your mobile device has been switched off. As cameras independently push streaming to the live platform, it does not go through your mobile devices.
Steps to push stream: Select the camera that you wish to stream, then fill in the target platform info. (Please note that saving history platform info is temporarily unavailable)

Recorded setup instructions
You can do recording through the recording function, recording to micro SD card, or local recording through the application.

How to record video while live streaming?
You can turn on the recording function while streaming, and you can choose to record them to the microSD card or the local application.

Which live streaming platforms do we support?

How do I adjust the device input resolution?
You can set the video input quality of your camera
Note, however, that you cannot change the Settings if you are live-streaming

Why do different symbols and colors appear on the platform icons during live streaming?
If the icon is lit, the stream is being pushed
The green loading icon lights up to indicate that you are trying to reconnect
A red exclamation mark is lit to indicate a failed push
When the red exclamation mark appears, you can click on it to try resetting your push stream address

What are the possible reasons for streaming failures?
RTMP push failure causes:
- The login information has expired
- Platform restrictions
- The Internet can not be accessed
The common account login mode fails to be pushed.
- The push code has expired
- The server address is incorrect
- The platform did not start live streaming
- The Internet can not be accessed
How to add the device in OBS?
Solution 1: Use a device as a microphone and camera directly connected to a computer via a USB cable.

Solution 2: Use a virtual camera
Step 1: Connect the cameras to our APP EMEETSTREAM.
Step 2: Open the OBS, and add the EMEET virtual camera as your video capture device.

Solution 3: Push streaming media through the RIST protocol
Step 1: Connect the cameras to our APP EMEETSTREAM via WIFI.
Step 2: Open the camera settings, find the RIST address, set the URL.

Step 3: Copy the corresponding address information.
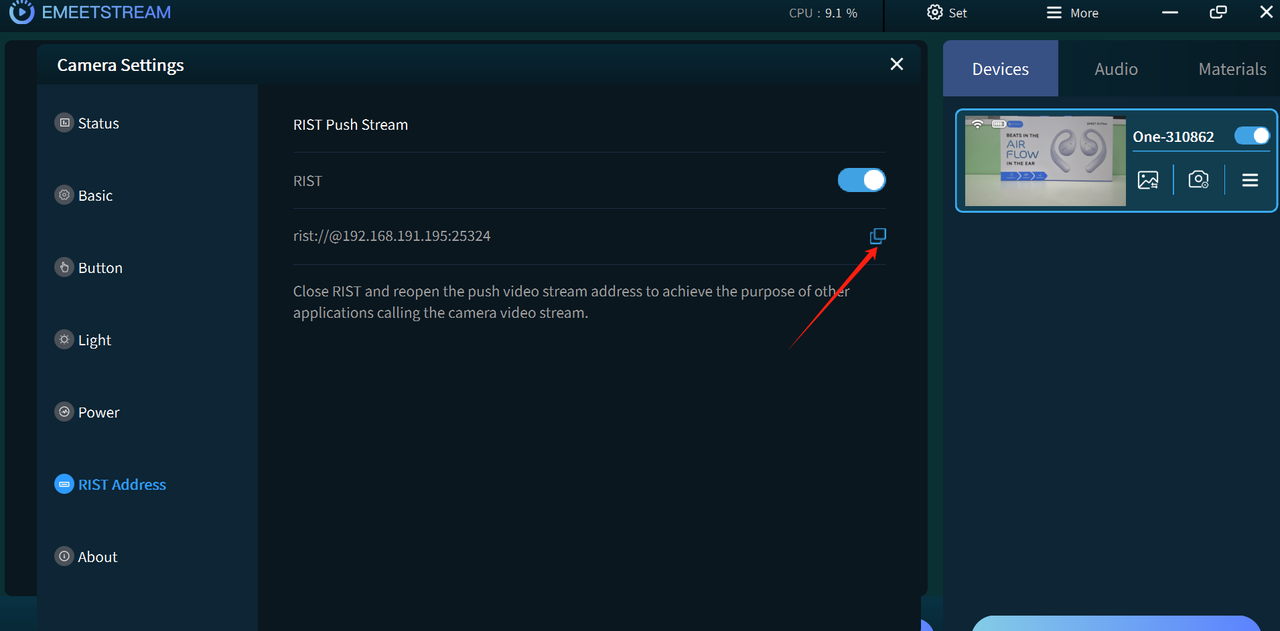
Step 4: Open the OBS, and add the URL to the Source list, then the image captured by this camera will be shown on the OBS.


How to choose a live room?
The optimal live stream room would be an independent and quiet space, with enough area. It can be a studio, an office, a room at home or a partition in a store.
How should my live streaming background look like?
The best background for a live room is light and solid-colored, simple, and bright-based, without being too fancy. Of course, a green screen can also be chosen, so you can select any virtual background based on your needs.
(However, it is not recommended to choose the green screen to use regularly. Relatively speaking, the live room scene built with the green screen is not coordinated enough and may have a little abrupt feeling, and the effect is not as good as that directly built.)
On the other hand, the Tik-Tok live room is mostly gray-color-based, which is simple, and gray is a neutral color, which can be matched with any color. In addition, the color gray is the most suitable background color for the camera, which will not be overly-exposed, and the visual comfort is conducive to highlighting the color of clothing, makeup, or products.
How should I place the fill light that I've bought to enhance the overall lighting performance?
In addition to proper decoration and reasonable layout, the most important thing for a good live broadcast room is "lighting".
Good lighting layout has three uses:
First, effectively enhance the overall image of the anchor;
Second, show the highlights of the brand and product;
Third, change the atmosphere of the live broadcast.
Room light:
This is the ceiling light of the live broadcast room, which can also be an LED lamp, mainly responsible for the room lighting; the function of the environment lamp is to make the whole live broadcast room bright.
Main Light Source:
The main light source refers to the main light that reflects the appearance of the main host and products, which plays the role of the main lighting. It can make the face of the main host and the product evenly illuminated and whiten the skin simultaneously, making the face of the host and the product look mild. Using a spherical lamp as the main light source is recommended because the light emitted by the spherical lamp is soft enough, preferably with a color rendering index of more than 96%.
Fill light:
Generally, the side is illuminated at 45 degrees and cannot be directly illuminated from the front or back. This is mainly to make the picture softer. The skin of the anchor looks glossy and delicate. Now many live rooms use unique circular fill lights for anchors, which can both fill and soften the light.
The most commonly used lights in the live room include the main light, auxiliary light, contour light, top light and background light.
Main light:
It is the leading light source, which determines the main tone of the picture. In lighting, adding auxiliary, background, and outline light only makes sense after determining the main light. The live broadcast can make the host's face evenly lit, which is the first step in lighting beauty. Placement suggestion: Place it in front of the host, forming an angle of 0-15 degrees with the lens axis on the video camera. The light from this direction is sufficient and uniform, making the host's face soft and skin whitening. However, the disadvantage of the main light is that there will be no shadows when it is illuminated from the front, and there will be a lack of layering.
Auxiliary light:
To improve the level and tone of the shadow surface, auxiliary light should be added when lighting. In the live broadcast, the overall stereo feeling can be increased by adjusting the auxiliary light, which can highlight the outline of the side.
Placement suggestion: The auxiliary light at a 90-degree angle on the left and right sides of the host and the auxiliary light at a 45-degree angle on the left front can produce shadows on the facial contour to create a three-dimensional texture. The auxiliary light at a 45-degree angle from the right back can light up the contour on the rear side, making a strong contrast with the front light, which is beneficial to create the overall host shape. However, attention should be paid to adjusting the light ratio to avoid over-exposure of the face or being too dark in some parts.
Backlight:
Backlight, also known as a rim light, is usually placed behind the anchor to outline the anchor's silhouette and highlight the subject.
Placement suggestion: Set it in the position behind the anchor, and the light from behind can make the anchor's outline clear and separate the anchor from the live room background, highlighting the main body. As a backlight, be sure to pay attention to the brightness adjustment of the light. If the light is too bright, it will directly cause the effect of Buddha's light shining in the back of the anchor, making the main part of the picture too dark. At the same time, the camera will cause glare; improper use can easily cause adverse effects.
Top light:
Top light is a light source secondary to the main light, shining from the top position to add lighting to the background and ground so that the shadows of the host's cheekbones, chin, nose, etc., can be lengthened visually to lengthen the facial contour to achieve the effect of a thin face. This is also one of the commonly used lights for anchors.
Placement suggestion: The light coming down from above the host can produce a strong sense of projection and achieve the effect of a thin face. Top light has many advantages, but the disadvantage is that it can quickly form shadows under the eyes and nose.
Background light:
Its primary function is to set off the main body or render the atmosphere to make the brightness of the live broadcast room as uniform and harmonious as possible.
Placement suggestion: However, the background light is a uniform lighting effect, so the lighting should be arranged in a low light and multi-source way.
Can StreamCam One still be used if the battery is broken?
Sure. To avoid any potential issues caused by a defective battery, we allow you to power streamCam one with an external power source. All the functions of streamCam one will work properly when powered by an external power source.
Please note that the battery of streamCam one is not removable and should not be taken apart or replaced.
How do I reset the camera?
Before resetting the camera, please turn on the camera and press the reset hole with a mobile phone needle for 2s. At this time, your camera will reset the saved settings information.
If you have connected the camera to the network before, the status indicator light on the front of the camera will change from green to green flashing, indicating that the camera has been reset.

You can also find the option to reset to factory settings in the settings of the EMEETSTREAM software.

After resetting the camera, the following settings information will be restored to the default settings:
- Delete the connected wifi information;
- Short press function of power button;
- Light brightness;
- Camera access password;
- Automatic shutdown time;
- Power supply for external power supply;
- Open power supply with USB cable;
- Automatic switch wide angle mode;
- Rtsp mode;
- Enable automatic recording function.
What to do if the camera crashes?
If your camera is not responding, please refer to How do I reset the camera to restart the camera. The camera will be back to normal after restarting.
How to hard reset the camera?
If your camera is not working properly or not responding, please press and hold the power button for 10 seconds and then power on the camera again. This will complete the hard reset of the camera. Please make sure to press and hold the power button for 10 seconds even if the camera appears to be off and unresponsive at the time.
Note: Hard reset will not undo any settings saved on the camera, your network settings and logged-in livestream accounts will remain saved. If you want to reset the settings information on the camera, please refer to How do I reset the camera.
Why is EMEETSTREAM able to successfully configure the network to the device, but when the connection button is clicked, it displays a 'connect fail' message?
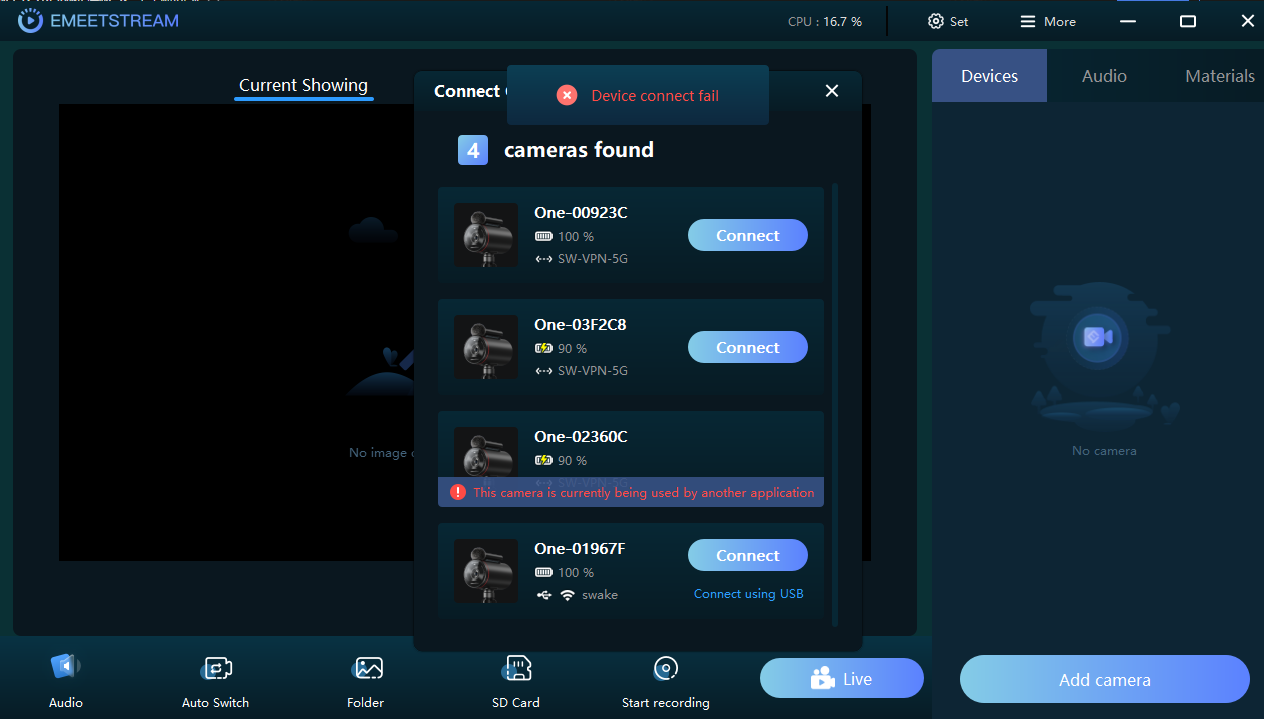
If you are unable to connect EMEETSTREAM to our StreamCam One, please check whether your computer firewall is preventing the software from connecting to the device.
We offer the following three solutions to solve this issue:
Solution 1
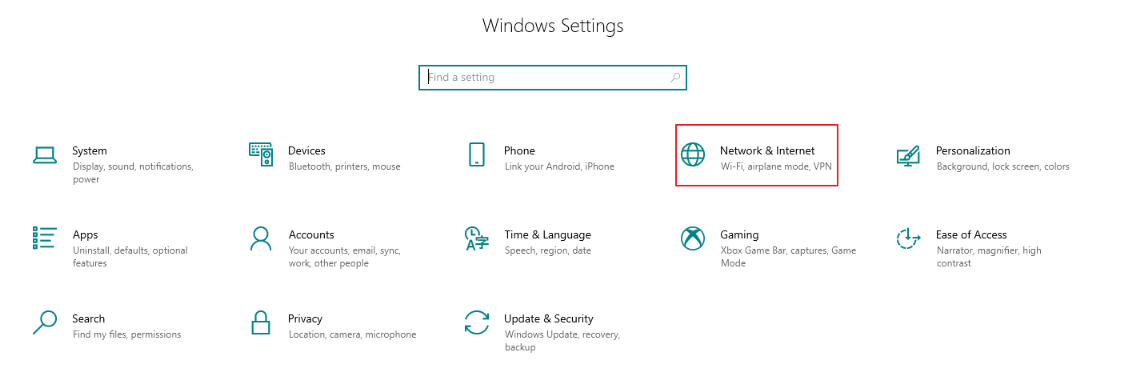
Check your current network properties
Open your computer settings, find "Network & Internet", go into the "Status" section, locate the corresponding Wi-Fi network and click "Properties". Then you can check if your network is public or private.

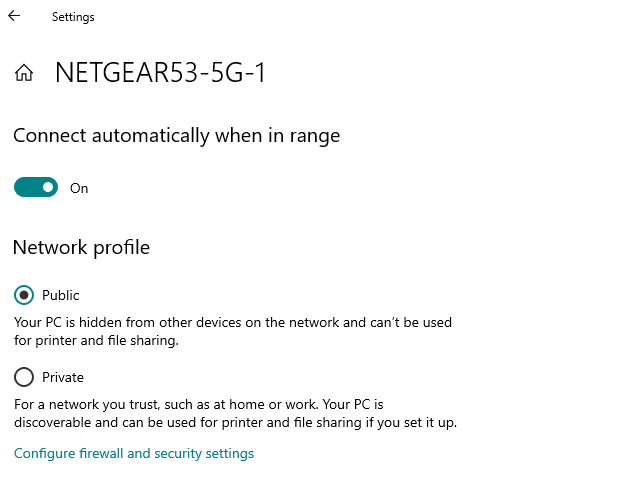
Turn off the firewall for the selected network
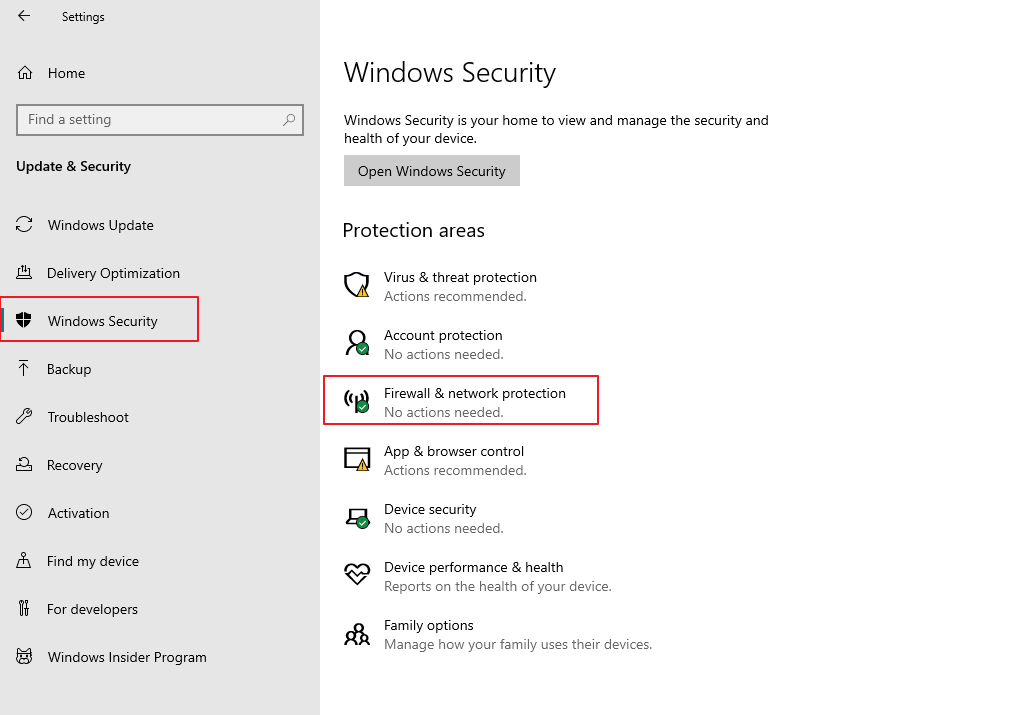
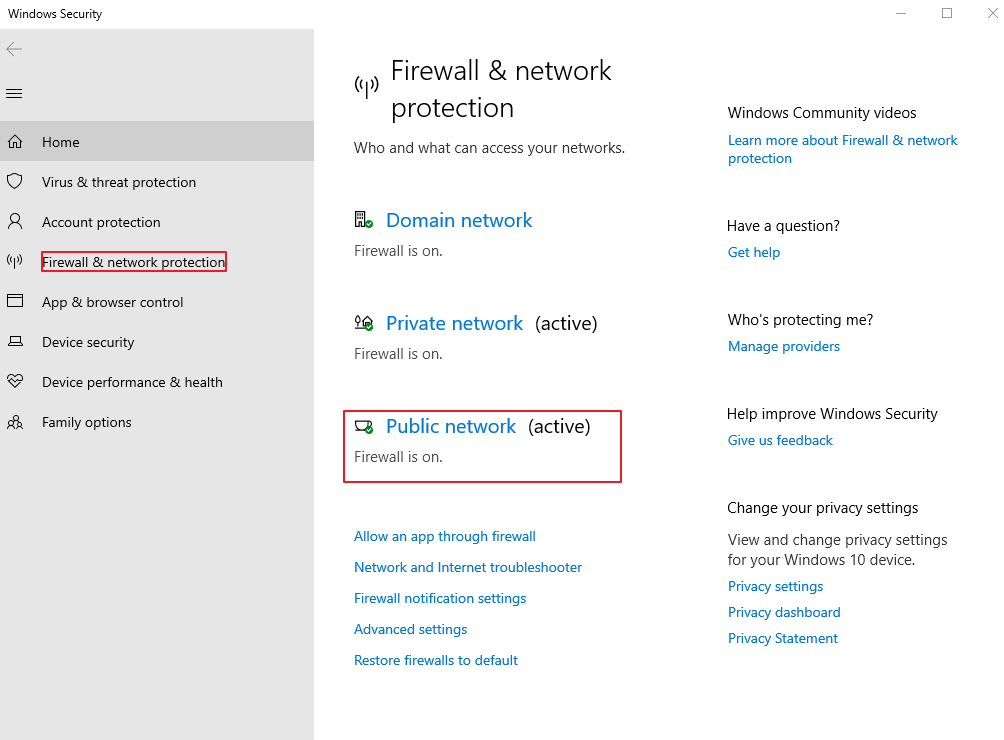
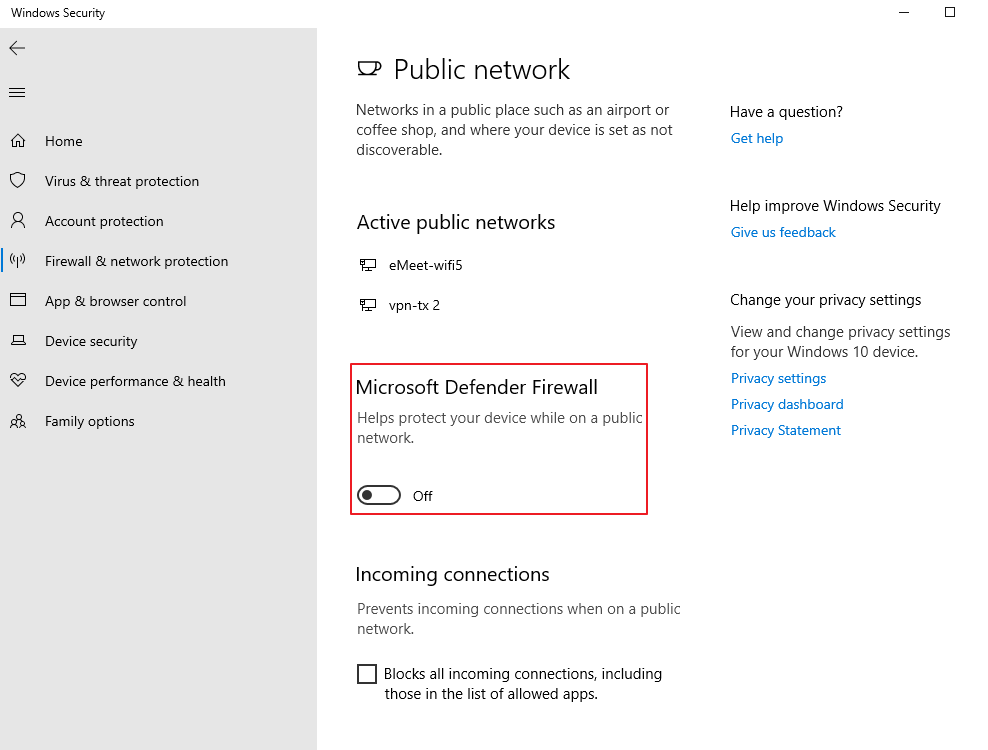
Open computer settings and go to "Update & Security". In the "Windows Security" section, select "Firewall & Network Protection". Click on the network that you want to change. Turn off the Microsoft Defender Firewall by toggling the button to "Off".

Solution 2
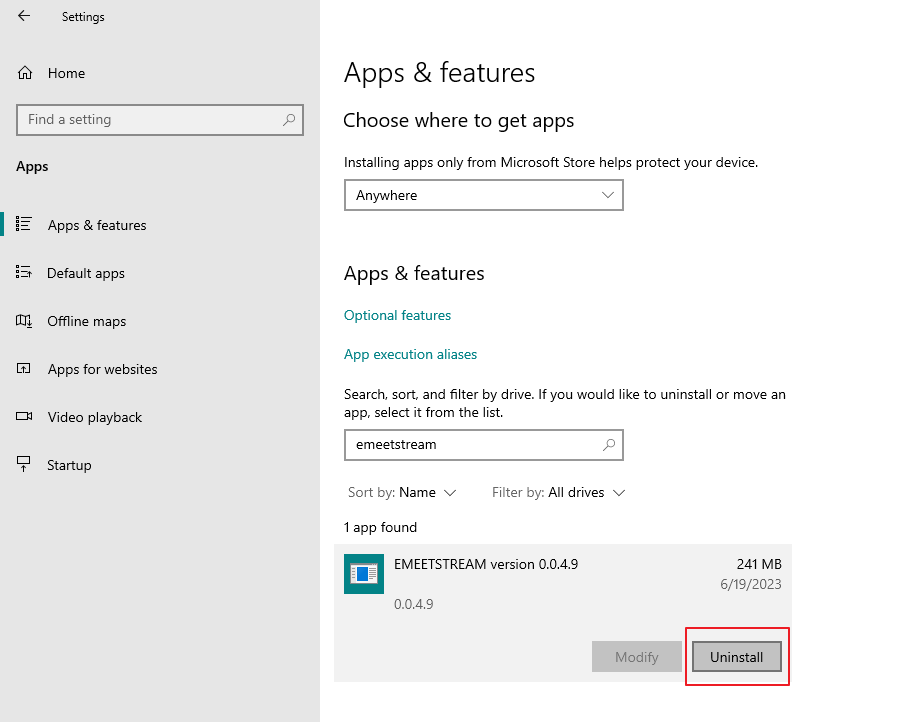
Uninstalling EMEETSTREAM, it will clear the configuration information related to EMEETSTREAM in your computer's firewall.

After reinstalling EMEETSTREAM, the Windows Security Center alert will pop up again. Please make sure to check both the Private Network and Public Network options.

Solution 3
1. Access the advanced security settings of Windows Defender Firewall:
Open your computer's Settings, then find "Update & Security". Click on "Windows Security", click on "Firewall & Network Protection", and Click on "Advanced settings".
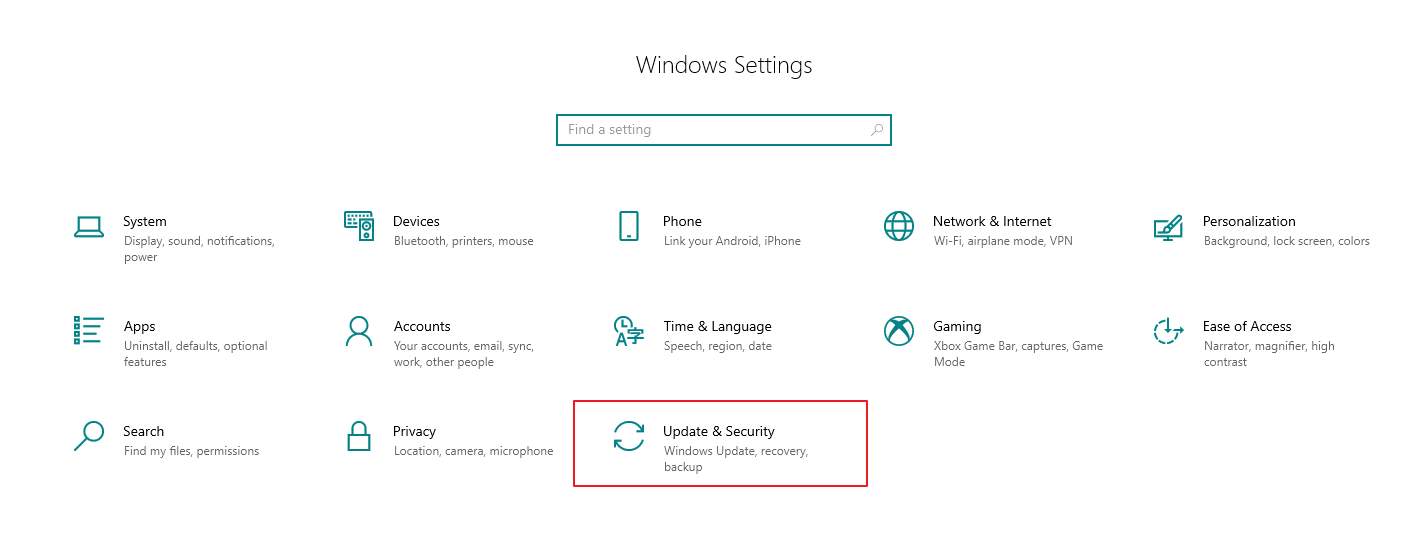
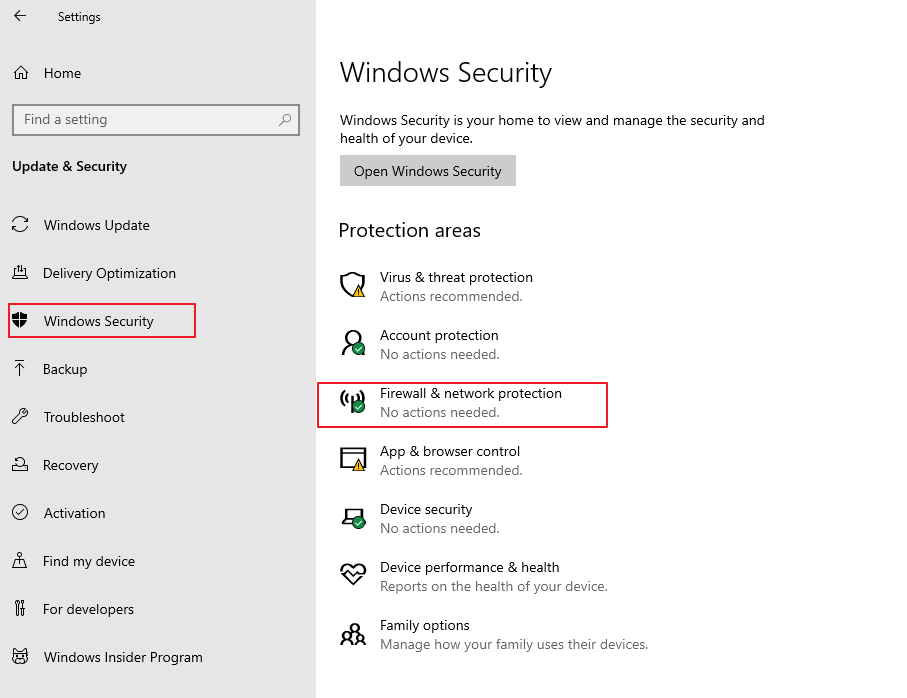
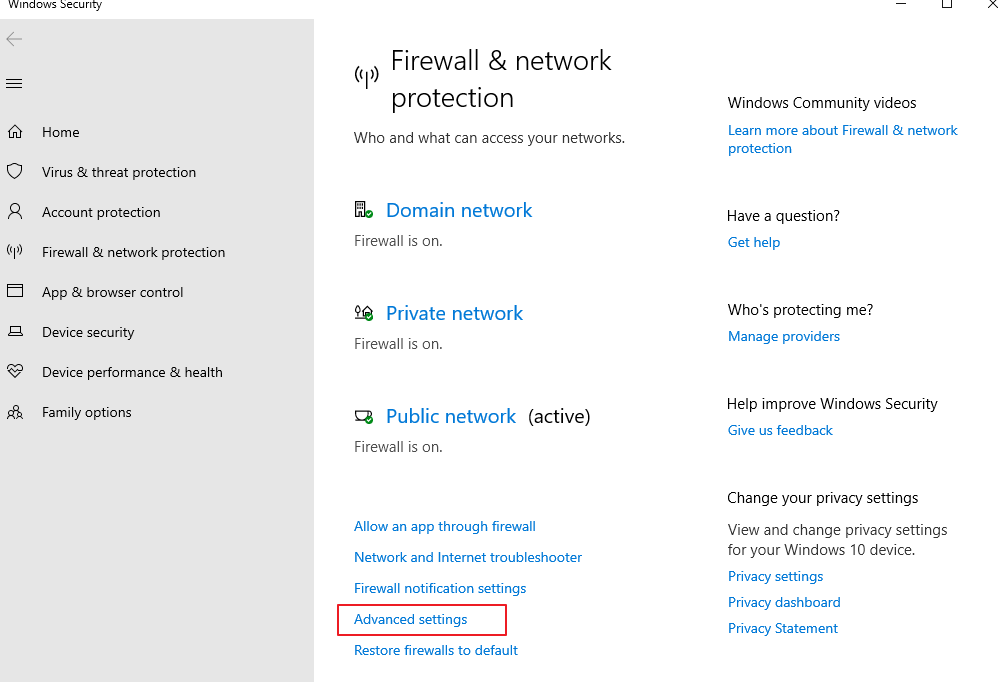
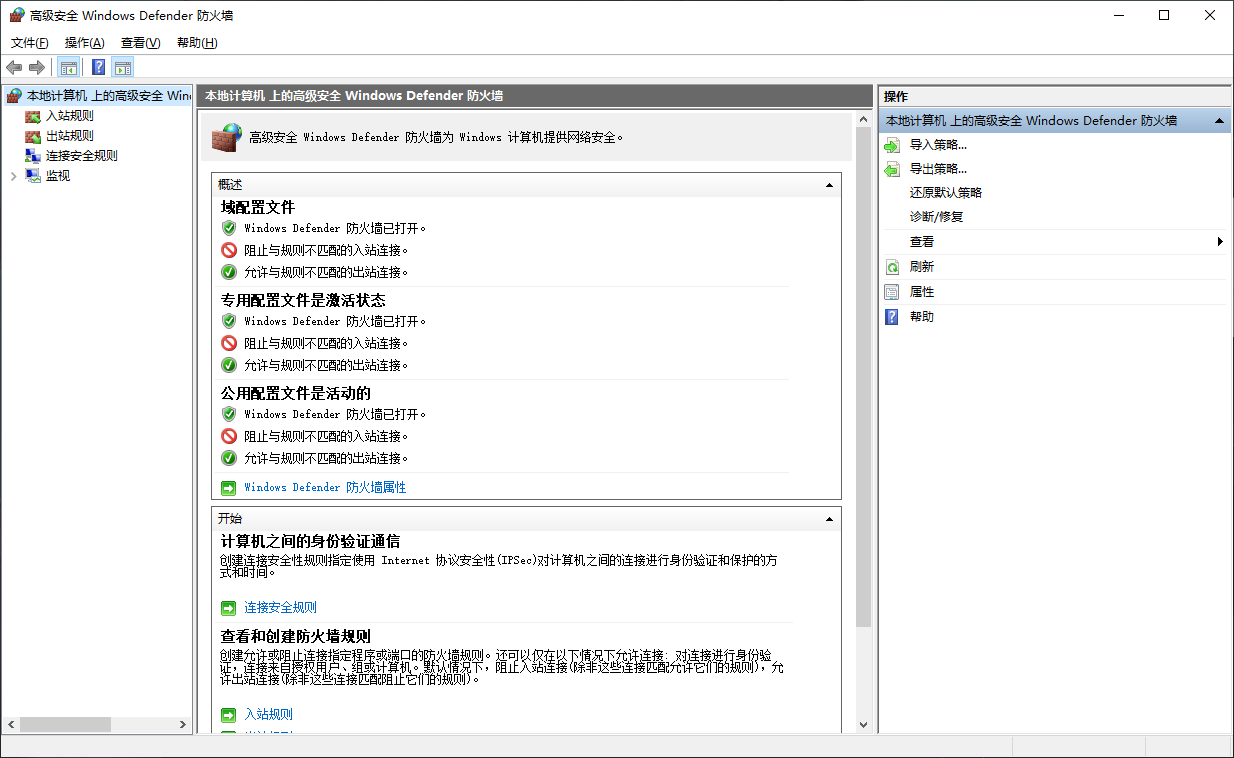
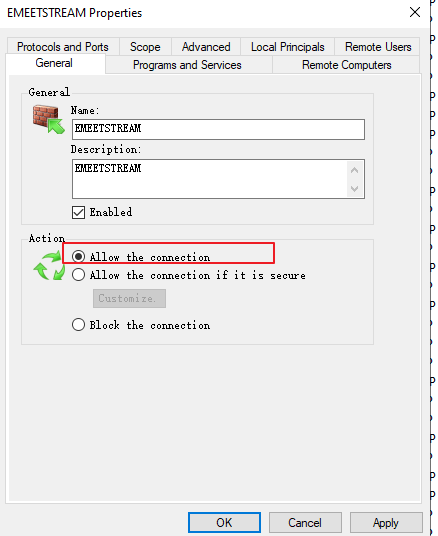
To find the inbound rule, double-click on it and look for EMEETSTREAM on the right-hand side. Since EMEETSTREAM was initially set to only allow communication on a private network, you may see that its operation is allowed on private networks but blocked on public networks.

Double-click on the blocked EMEETSTREAM and select "Allow the connection" in the pop-up window. Then click on "OK".
Why does EMEETSTREAM on my computer show that the device needs to be configured network even though it has already been configured for StreamCam One?
If the "Configure Network" message keeps appearing on your software page, please follow the steps below to troubleshoot:
Please confirm if the network you configured for the device is the same as the one that your computer is currently using.
If not, please configure the network for the device that matches your computer network. Check if your computer is using VPN. If VPN is turned on, it may prevent your computer from detecting the device. Please turn off VPN and configure the network for your computer. Check if your current network is a private or public network. If it is a private network, please turn off the corresponding firewall by referring to the three troubleshooting solutions we provided in "Why is EMEETSTREAM able to successfully configure the network to the device, but when the connection button is clicked, it displays a 'connect fail' message?"
Check if your computer is connected to both a wired and wireless network. If you are using both to connect to the network, please disconnect one.
Restart the device and the APP, and then configure the network for the device again.
How to view videos saved on the SD card using a computer?
View directly through the EMEETSTREAM PC software while in a connected state.
Read the SD card directly.
You may need to pay attention to the following issues:
When there is a lot of video content on your storage card or when the opened video is long, the EMEETSTREAM software loading may be slow and the playback may be staggered. For a better viewing experience, we recommend that you use a card reader to view it on your computer.
Make sure your computer is equipped with an SD card reader. If it doesn't have a built-in reader, you can use an external card reader to access the recordings.
Check to see if the recording format is compatible with your computer's media player. If not, you can use a format conversion tool to convert the recording to a compatible format or consider using a third-party media player to avoid playback issues.
Some recommended third-party media players include:
PotPlayer:https://potplayer.daum.net/
VLC media player:https://www.videolan.org/vlc/
Why is there an abnormal display?
It is common to experience issues such as screen freezing, significant delay, buffering, and interrupted video playback when the network connection is poor. This is caused by unstable network data transmission, and the following solutions may help:
Check the status of the network connection to ensure it is secured and stable. If there are other devices that are consuming a large amount of bandwidth, try turning off these devices. If the network is not stable, try switching to another network provider or upgrading to a better network package.
Verify that the device is located in an area covered by the network signal, and avoid remote locations or obstructions that can interfere with the signal reception and transmission.
Adjust the video quality. If the network is poor, try reducing the video quality to a lower or standard mode to decrease bandwidth consumption of video transmission and thus mitigate the issues.
What network is being used for live streaming when the mobile device is connected to the device hotspot?
Our software supports using the mobile device's 4G/5G network for live streaming when connected to the device hotspot. Please follow the following steps to ensure that you can successfully livestream:
Enter the EMEETSTREAM APP homepage and select "Add Camera";
After searching and locating your camera, select it and enter the network configuration page. Choose to use the EMEET camera hotspot for network configuration, and set a password for the camera hotspot.
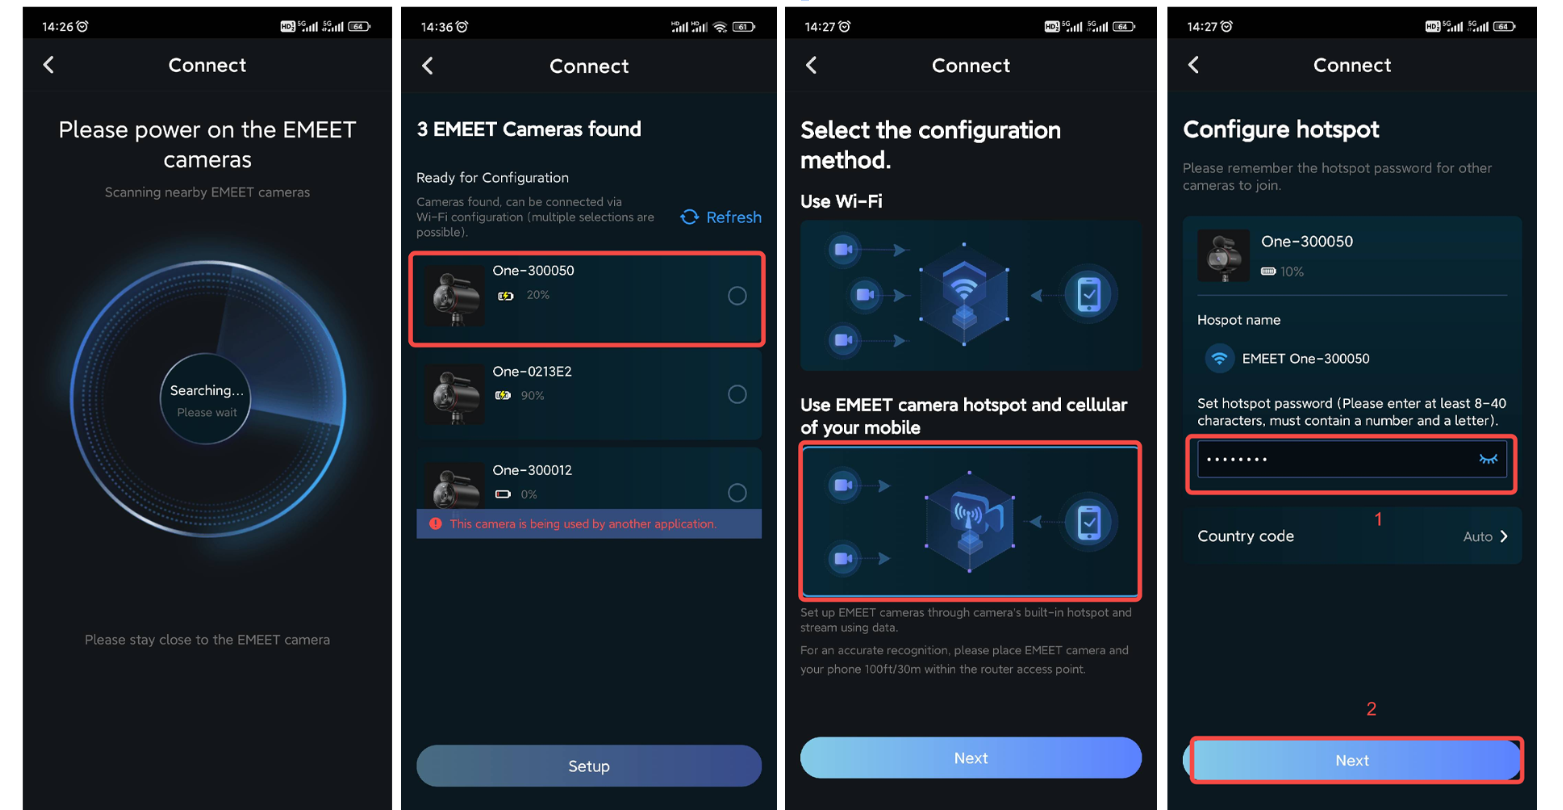
Click "connect" and confirm. If your phone is not connected to the network, a pop-up window will appear to prompt you to connect to the network. Click "Connect." Inside the pop-up window, select your device hotspot to connect. After a successful connection, click "Finish," then select "Confirm Connection" to the device.
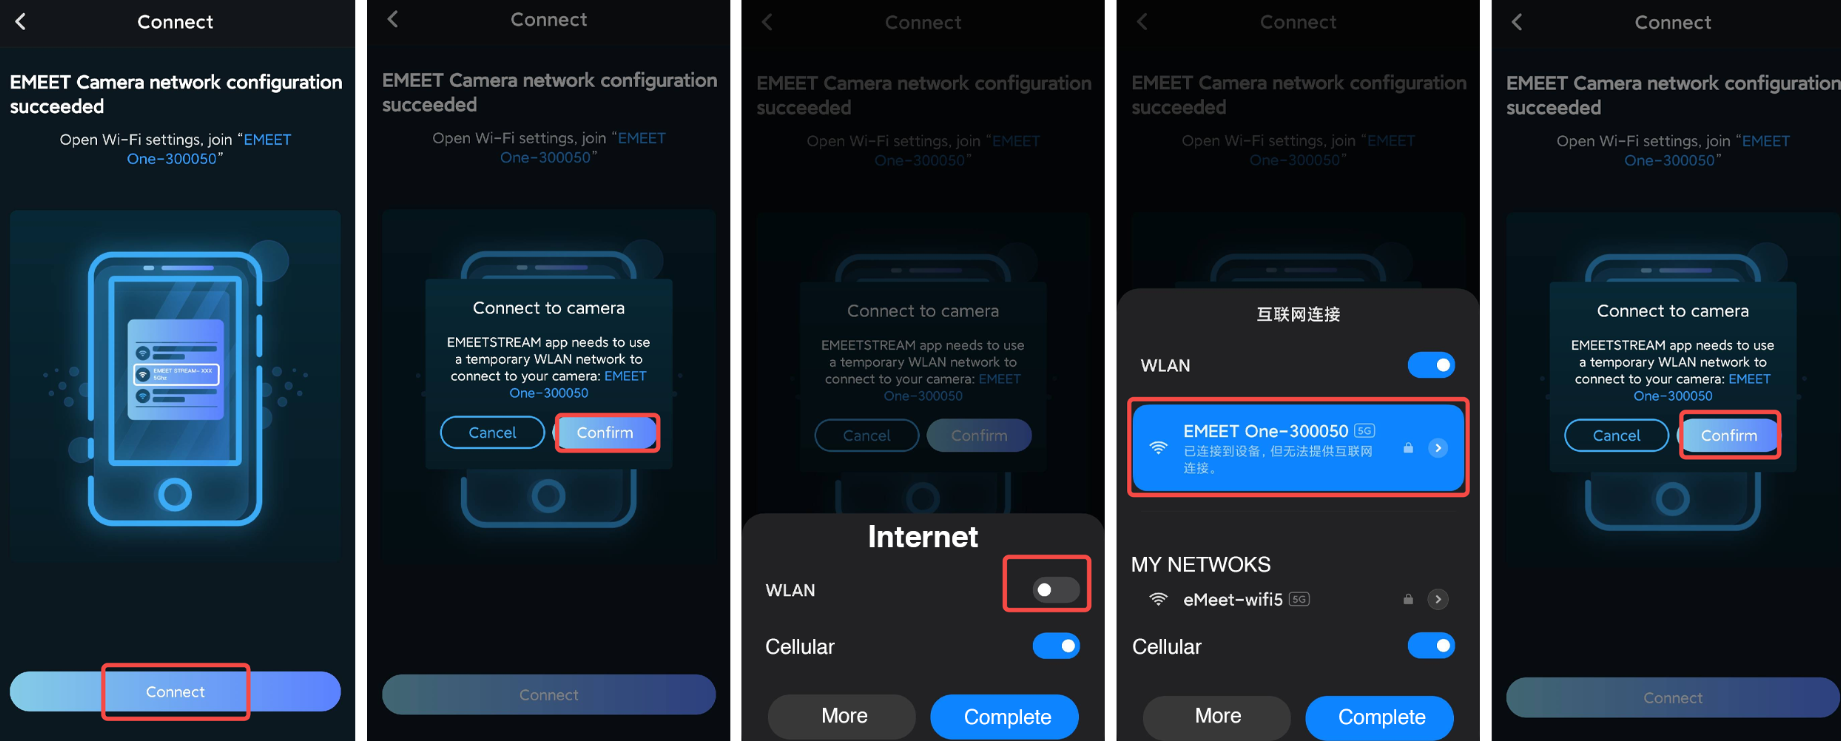
Note: Do not exit the app page and enter the phone's network settings module to select the camera hotspot. Doing so will result in no access to the 4G/5G network for streaming after connecting to the camera hotspot.
After successfully connecting to the camera, select the "Start Live" button and choose the platform you want to stream to. Enter the streaming code, and click "Confirm" to start your live stream.
What should I be aware of when connecting multiple cameras to a computer?
When multiple cameras are connected to a computer at the same time, only one connection method can be used, either through USB Cable or wirelessly.
If the first camera is connected to the computer via a wired connection, regardless of whether you have previously configured a wireless network for the camera, other cameras can only be connected using a USB cable.
Additionally, when you connect the second camera via a wired connection, only the wired connection option will appear on the connection page, that is, there will be no option for a wireless connection.
If the first camera is connected wirelessly to the computer, when you configure the second camera, only the "configure network for camera" option will appear on the connection page, and you cannot connect it directly to the computer using a data cable. If you have already configured your current computer's network for the camera, you can directly search for and connect to the camera.
Note: When configuring the camera network for the first time, you need to connect the camera to the computer via USB. Please refer to the following video for specific steps.
What should I pay attention to when logging into social media accounts?
Due to software restrictions, logging into Facebook can only be done through the Facebook mobile APP or Google browser. You cannot log in through other browsers.
Why does my EMEETSTEAM software interface display abnormalities?
If your EMEETSTEAM interface displays abnormalities, it may be due to some programs being omitted during the installation process or being mistakenly killed by antivirus software.
Please follow the steps below to restore the interface.
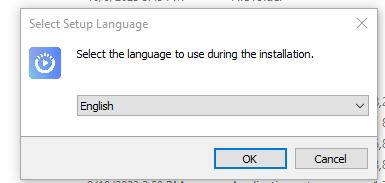
Step 1: Right-click on the downloaded "EMEETSTEAM" and select "Open file location", as shown in Figure 1.
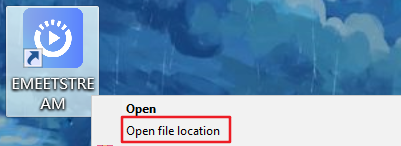
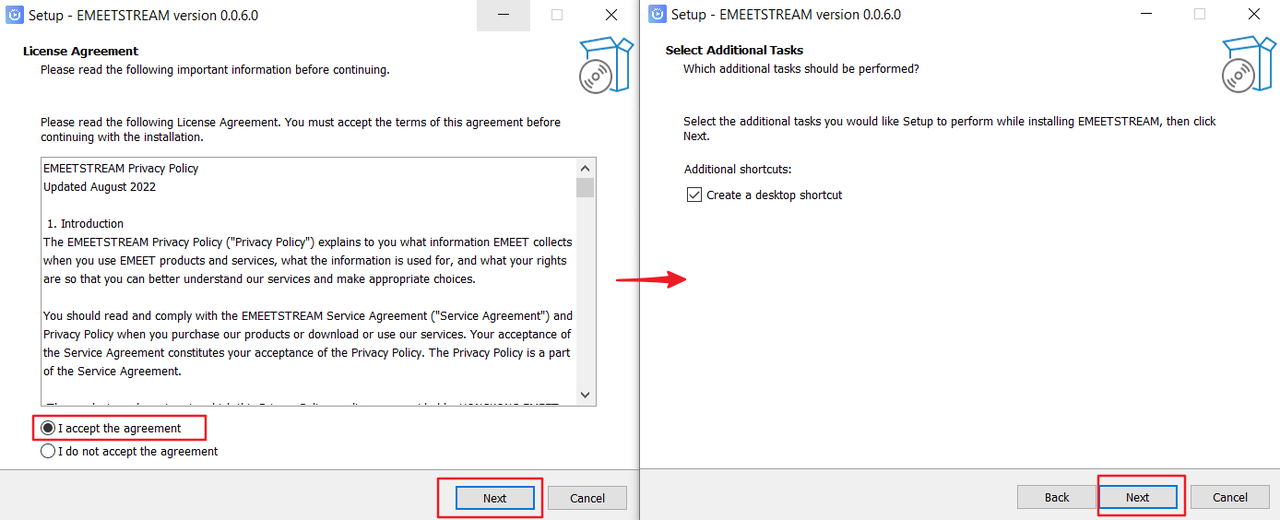
Step 2: In the file, find and double-click "EMEETSTEAM Upgrade" to enter "Upgrading", as shown in Figure 2.

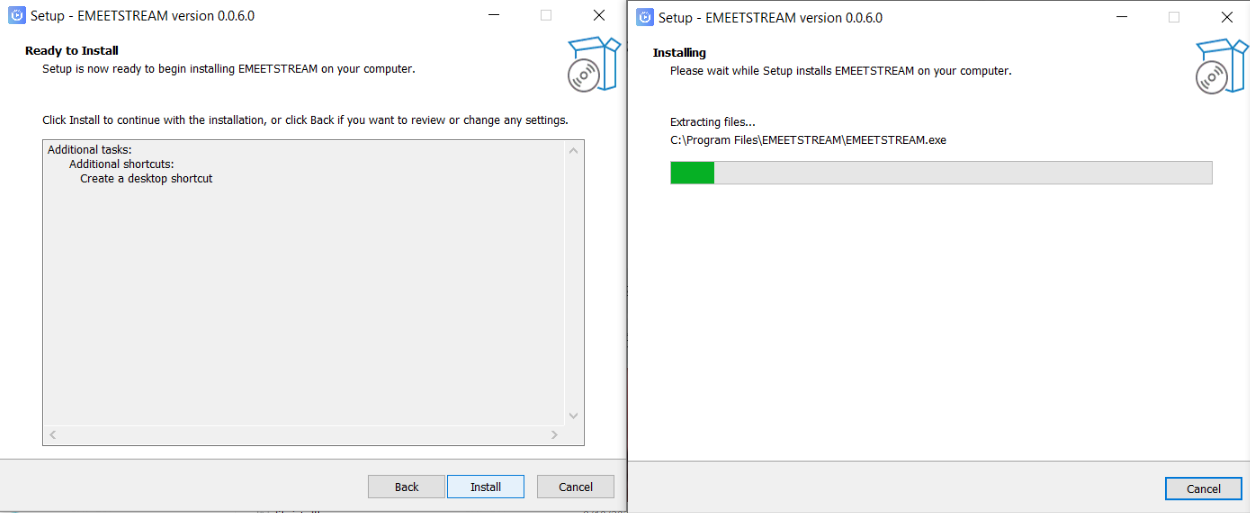
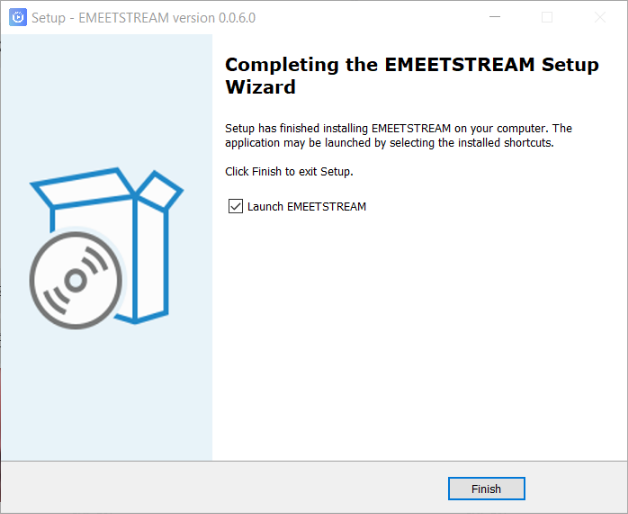
Step 3: At this point, a prompt box for reinstalling will pop up. Click OK to start the installation.
What should I do if I can't connect to the device or if I can't get a picture?
1. WiFi Connection
Please check if your phone is connected to the same network as the device.
If they are not connected to the same network, you need to switch to the right network.
2. Mobile Hotspot Connection
The following is a prompt on your phone when the mobile hotspot is connected.
Please confirm whether the device is really connected to the mobile hotspot.

What should I do if the prompt to reconnect the camera fails when connecting the device?
When the camera is bound and used by another device, attempting to connect it with a new device will result in a connection failure prompt, and the device originally connected to the camera must be unbound before the new device can be connected and used properly.
The function of an occupancy prompt will be added in the future, which means that if a device has already connected to the camera via EMEETSTREAM, a corresponding prompt will appear when attempting to connect with a new device, informing the user that the camera is already occupied.